Featured Post

Kerala House Construction Tips

This site gives you Kerala house construction tips based on different photos of house construction.Construction of a house is an achievemen...

Wednesday, March 23, 2016

Wall construction tips: cement block

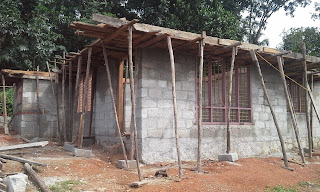
Concrete/cement block has been used as a building material for house construction in India. It is less expensive than red bricks. Cement/concrete blocks are manufactured using cement, different sizes of aggregates and water.

Concrete/cement blocks are available as solid or hollow. The blocks are coming in different sizes. Most commonly, concrete blocks comes in 16 by 8 inches with 8 inches high. The measurements may different according to usage and availability. Concrete/cement blocks are durable and fireproof and it is termite proof also.

Partition walls in house construction can be built quickly using concrete blocks. Because of the big size of cement bricks, wall can be finished quicker than smaller red bricks.

Concrete block is less expensive as a building material than red bricks. It may also reduces plastering expense as it is smoother and even than red bricks.

Instead of cement block you can go for red clay bricks. How to select good quality bricks. You can check the size and shape of bricks. Bricks must be in good shape and size. Avoid cracks, sand projections. Check for evenly heated bricks. Also they must have even color.  Good bricks will be hard. If you strike on the brick it should produce a ringing sound. Also you can check the water absorption level of the brick. It should not absorb more water and get fully wet. It can intake around 10 to 20 % of the bricks weight. Brick will not break easily when droped to ground.

Monday, March 21, 2016

Kerala House Construction Tips

This site gives you Kerala house construction tips based on different photos of house construction.Construction of a house is an achievement for everybody.

We have to construct a flawless house. For that we try to get house construction tips. From my experience I can give you some practical house construction tips in the perspective of a house owner. These tips can give you some basic ideas about house construction especially for Kerala house construction.

Before we start with house construction definitely we have to collect better ideas of different house construction practices exists near to us. Otherwise we may land up in making mistakes. These house construction tips in this website can help you avoid such errors. While going through these house construction tips, if you find any fault in my construction methods, definitely you can change that and follow any better idea. This house construction tips are from original construction site and I provide actual photos.

These tips are actual and practical house construction tips and I hope it will surely help to have a concrete idea about it.

Friday, February 19, 2016

13. Curtains

Interior. Curtains.

We selected a different design for curtains.  The front hall is with siege color paint (similar to half white). Above lintel portion is with chocolate color. And for the middle portion of the curtains we gone for matching piece with chocolate color. 


In first bed room the main wall is chocolate like and above lintel is a florescent green. So here the middle portion gone with matching green.


Second bed room is with dark leafy green above lintel. So the middle portion of the curtain is matching green.


Thursday, February 18, 2016

12. Painting

The final part of a house construction: Painting.

We used Asian paints. We have gone for multiple colors instead of creating few color patterns. Selecting colors is big task. It may create confusions at some part of it. The colors shown in their catalogs, in their color studios and original are totally different and confusing. So I decided to buy few color samples first. Then the samples were painted in small portions and valued. After this we can get choice to change or not to change. Then only we can go for final selection. 


Some paint colors made darker by adding more color stains. If we want to make lighter then we can add white base color.


Colors for Pergola. Instead of going for several colors, we decided white color for pergola. And added deep blue for inside portion. That gave a lighting effect between pergolas.


11. Parapet and Plastering

The parapet in the front portion has done with clay bricks (ishtika). Here a pillar like structure which looks similar to pergola has created. In other places the parapet is done cement bricks. 


After the parapet, outside wall plastering started. For wall plastering, river sand also mixed with rock sand to get smooth surface. Watering should be done twice daily for seven days for each plastered walls. 


Inside plastering:  
Plastering the inside walls started after finishing outer walls.


Sunday, February 14, 2016

10. Floor concreting

Concrete on floor is done in a new method. At first big metal has put and made flat by hitting with heavy iron rods. Then added a mix of sand and cement. Cement proportion is very less. Do not add water now. Pour this onto the metal through out the floor. After completing this pour water on the top and brush with broomstick. This method will definitely reduce the expense. But others say that it is very strong. Putting metal concrete is very expensive.


This floor concreting was done before wall and stair plastering. At the time of stair plastering, so much cement will fall down to the floor. This cement will be removed, still a part of this cement may stick to the floor and make it very strong.


At the time of putting tiles again floor plastering will be done. So this method of floor concreting looks good. But I am not sure. All these opinion are from a view point of a house owner. I am not a civil engineer or technician. 

Friday, February 12, 2016

9. Electrical and plumbing work

After roof concreting we can start electrical and plumbing works. Cut wall for laying PVC pipes for electrical cabling. Also provide cuts for fitting switchboards. Decide where to install meter board and PLCB. Don't forget to allow enough plug points rather than using multi pins, as it  may cause electrical problems. 


If you want to install inverter, tell electrician about this at the beginning. Connect CFL bulbs or LED bulbs into invertor. That can reduce the battery consumption from inverter. Calculate how many power plugs should be provided and decide where to give that lines.


Plumbing jobs also can be done together with electrical work. Use premium quality pipes especially that goes inside wall or floor. Put lines for water heater. If you think of solar water heater, put separate line for that. Now a days heater are coming with electrical and solar capabilities. At the time of raining you can use electrical heater. 

Wednesday, February 10, 2016

8. Roof concrete

Roof Slab:

Roof concreting is considered as one of the main work regarding building construction. Whole part of decided concreting should be finished at a stretch without break. So every materials recquired should be collected prior to the concreting. Enough workers should be there. Concrete mixer and vibrator is needed. Enough water should be collected in water tanks.


  • For a right roof slab concreting, we have to prepare proper concrete mix.
          The main point to bear in mind is, keep the ratio between fine aggregate and coarse aggregate             should be 1:2. In case of single or two story house the ration of concrete mix will be 1:2:4
  • Never ever add excess water to mix concrete. The correct proportion of water should be like this: When we take concrete mix in a plate, it should become like a scoop. This type of mix makes the roof slab strong. If workers tries to add more water for work-ability do not allow it.
  • Make sure concrete mix is properly covered around and near to the iron reinforcement. Use vibrator to move concrete everywhere evenly.

After concreting, on the next day morning watering is a must. For this we have to divide roof top into small portions by putting cement sand mix as seen in the photo. Retain water continuously for 7 to 10 days. In corners with slanting areas it is not able to retain water. In such areas put jute bags (gully bags) and wet jute bags. As we are using rock sand it will take more time to cure cement as concrete. So watering should be done very seriously to avoid concrete cracks in future.


Sunday, February 7, 2016

7. Preparation for roof concrete

Putting wooden pieces (shuttering) to give support for roof concrete. Instead of laying wooden pieces completely, we put wooden planks like this and lay thick iron sheets. That is the new trend. Do not forget to give enough support below with supporting posts (centering). 


Laying steel bars according to specification. You can see thicker steel bars that is for beam in front hall.


Steel bars for beam


Put PVC pipes for electrical lines which is used for electrification on ceilings.


6. Wall above lintel

Constructing wall above lintel

Above lintel the wall is 3 feet (including lintel height). So total the height from floor level to roof will be 10 feet. Give spaces for air vent. Remember to allow cross vent ie; Give air holes opposite to each other. One is to get air in and other is to get air out. This also called 'crows vent' because if there is some food item inside a room, the crow will come, only if there is a window opening on the back side also. Through one window it will come in to pick food and continue flying out through the window on back side.


Give at least two vent opposite each other, even for bed rooms in my opinion. This will reduce temperature inside the rooms. 


One thing I forgot to mention, I used Violet wood for windows and doors. It is very hard and durable. I purchased everything ready made. So it does not have good finishing. For me it is ok.


Friday, February 5, 2016

5. Wall and Lintel

Construction of building wall

I used solid cement blocks. There are merits and demerits. Cement block have 6 inches width while clay bricks (ishtika) have 9 inches. I felt 6 inches is very thin for the wall. It is better to have 9 inches minimum. Wall constructed at a height of 7 feet. Since river sand is very difficult and expensive to buy I used Pobsons Msand. This type of sand is very good for concreting. But to make cement mortar, (chaanth) mix it with river sand. Msand have more big grains along with small ones. Masons are usually reluctant to touch cement with hands, as it may damage their skin. What they do is add less water to cement mortar. This is not recommendable. Tell them to use appropriate wooden pieces to touch cement instead of using fingers.


Constructing lintel

Wooden support is erected for lintel and sunshade. Sunshade is planned only above doors and windows. No need to construct sunshade all around the building. Use steel reinforcement.


Putting steel bars for lintel and sunshade near kitchen.


Pergola near front door

Instead of sunshades for front door and window I transformed it into pergola. Below is a photo of putting wooden planks for pergola design.


Concrete on pergola.


Lintel all over the wall. While concreting lintel, it is advisable to put necessary PVC pipes for electrical lines. That is done by electrician. This will reduce slightly the need of cutting walls for electrical lines. See the photo below for black PVC pipes hanging from lintel.


Sprinkle water and retain there for few days. After five days you can remove wooden support from lintel. But allow it to be there for few days more from sunshade.